
Roll Your Own Cursor: Free Local AI Coding with Continue and oMLX
Cursor and Copilot cost a subscription and send every keystroke to someone else's server, but if you own an Apple Silicon Mac you can run the same ghost-text autocomplete and chat locally for free. This is how we set up Continue and oMLX, why the autocomplete model needs fill-in-the-middle support, and how to run two models at once without your Mac grinding to a halt.
Cursor and Copilot are good, but they cost a monthly fee and every keystroke you type goes to someone else's server. If you own an Apple Silicon Mac with a decent amount of memory, you already have the hardware to do the same job locally for free, and your code never leaves the machine. This is how we set ours up.
It won't fully replace Cursor, but it's a useful and private alternative that costs nothing and that you control yourself. It also gets better each time a new open model comes out.
The mental model
A lot of people don't realise that VS Code has no built-in ghost-text autocomplete. The grey "press Tab to accept" suggestion you get in Cursor or with Copilot is a feature those products add on top of the editor. To get it in plain VS Code you install an extension that provides the ghost-text loop, then point that extension at a local server that actually runs the model.
That local server is the second piece. We use oMLX, a native macOS inference server built on Apple's MLX framework. Like LM Studio, Ollama, or mlx_lm.server, it serves an OpenAI-compatible endpoint, usually at http://localhost:8000/v1, so any tool that speaks the OpenAI protocol can drive it. oMLX also exposes an Anthropic-compatible /v1/messages endpoint, which means the same running models can back Claude Code too, but that's for another article.
For the extension, the best free option is Continue. It has its own autocomplete role, separate from chat, and it gives you proper Tab-to-accept ghost text instead of sending everything through a chat box.
Choosing the right model
This is where a lot of people go wrong, because a general chat model gives very poor autocomplete. Inline completion needs Fill-in-the-Middle (FIM) support, as the model has to look at the code on both sides of your cursor to fill the gap, as well as guess what comes next.
FIM comes from a specific way of training, where the model learns to read a prefix and a suffix wrapped in special sentinel tokens, <|fim_prefix|>, <|fim_suffix|> and <|fim_middle|>, and fill the gap in between. The Qwen team built this into the Coder line from the start: the Qwen2.5-Coder technical report describes parsing code into an abstract syntax tree and masking out logic blocks as the "middle" to train on. Qwen3-Coder keeps FIM in every version. A plain instruct model that was never trained this way will give you rubbish in the middle of a line, however good it is at chat.
So your autocomplete model needs to be a Coder variant. We run Qwen2.5-Coder-7B-Instruct-4bit for tab completion and a larger general model for chat. Continue's own docs note that most good autocomplete models are no more than 10B parameters, because latency matters more than raw cleverness when you're completing as fast as you type.
We found this out ourselves. We started with a 30B Coder and the completions were good, but the lag between stopping typing and seeing the suggestion was just enough to break our flow. Dropping to the 7B made tab completion noticeably quicker, and it also freed up a lot of memory for the chat model. If your Mac is short on memory, a 1.5B or 3B Coder is faster still, and a smaller autocomplete model leaves more room for your chat model, which helps a lot when you're running two at once.
Setting it up
1. Confirm oMLX's endpoint
Find the port oMLX is serving on (check its menu bar app or settings) and check it's running:
curl http://localhost:8000/v1/models
The response lists the exact model id strings you'll need below. Keep them handy, because the model: value in your config has to match what /v1/models returns, character for character.
2. Load your models in oMLX
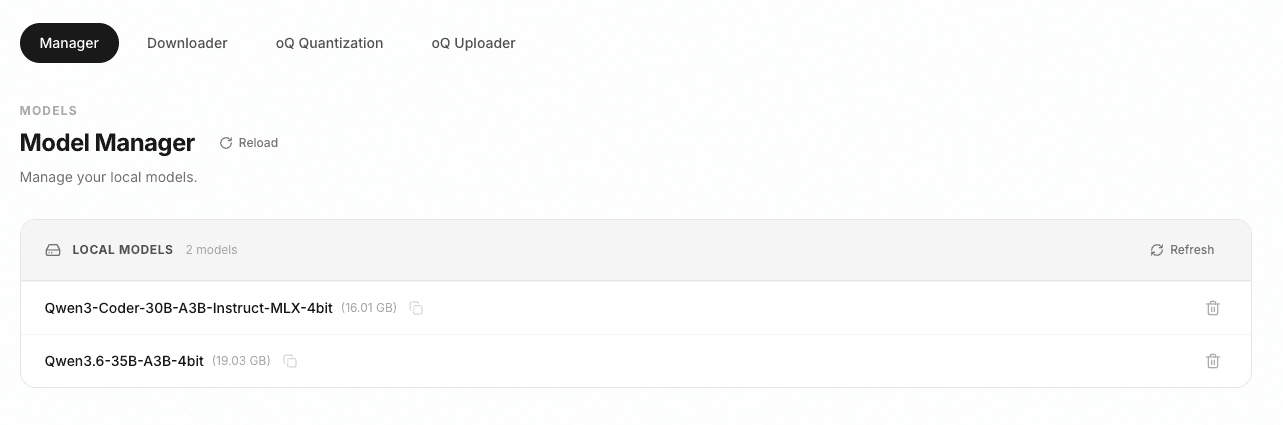
In the oMLX dashboard, download or select the models you want. We keep two loaded: a Coder for autocomplete and a bigger model for chat and edits. oMLX shows each one with its on-disk size, which is the first hint of how much memory you're about to commit.
3. Install the Continue extension
Open the Extensions panel in VS Code, search for "Continue" and install it. A sidebar icon then appears.
4. Configure your config.yaml
Continue moved from config.json to YAML a while back. The file lives at ~/.continue/config.yaml. Here's ours, with two models: a fast-ish Coder for tab completion and the bigger Qwen for chat and edits.
name: Local oMLX
version: 1.0.0
schema: v1
models:
  - name: Qwen Coder (autocomplete)
    provider: openai
    model: Qwen2.5-Coder-7B-Instruct-4bit          # must match the id from /v1/models
    apiBase: http://localhost:8000/v1               # match oMLX's port
    apiKey: <any-non-empty-string>                  # required by the schema, oMLX ignores the value
    roles:
      - autocomplete
    autocompleteOptions:
      debounceDelay: 250
      maxPromptTokens: 1024
      onlyMyCode: true

  - name: Qwen Chat
    provider: openai
    model: Qwen3.6-35B-A3B-4bit                      # your bigger model
    apiBase: http://localhost:8000/v1
    apiKey: <any-non-empty-string>
    roles:
      - chat
      - edit
A few things to know about that file:
provider: openaitells Continue to use the OpenAI request format, which is what oMLX answers, so you aren't actually calling OpenAI. TheapiBasepoints it at your machine.apiKeyis required by the schema even for a local server. Put any non-empty string in, as oMLX won't check it unless you've explicitly turned on authentication.autocompleteOptionsare the settings that control speed.debounceDelayis how long Continue waits after you stop typing before asking for a completion.maxPromptTokenscaps how much surrounding code gets sent, which keeps each request small and fast.onlyMyCodestops it dragging in node_modules and the rest.
5. Use it
When you start typing, grey ghost text appears. Press Tab to accept it or Esc to dismiss it.

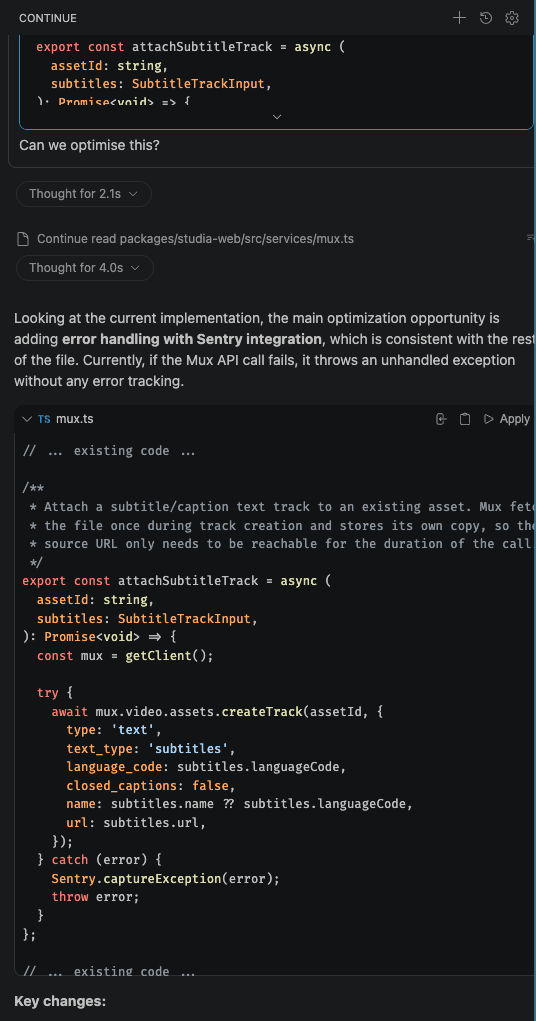
Chat and edits live in the Continue sidebar. Open it with Cmd + L, same as you'd reach for the chat panel in Cursor. Highlight a function, ask for a change, and the edit model rewrites it in place with a diff you can apply or reject.
Tuning oMLX: context size and sampling
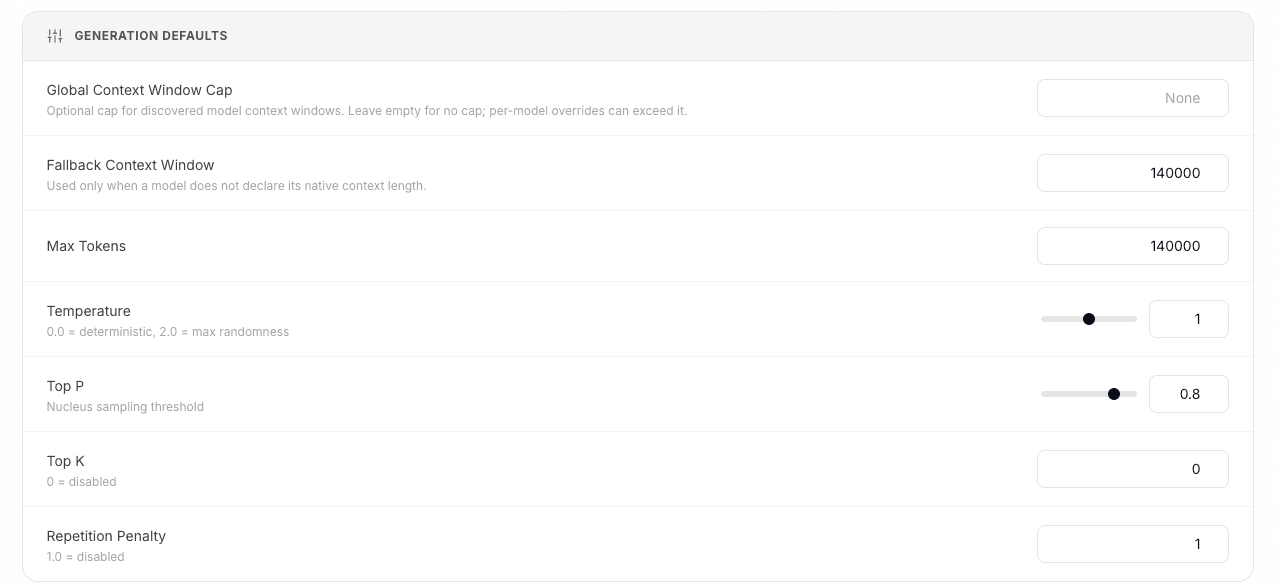
oMLX exposes generation defaults that apply across your models, and you can override them per model. There are two settings to look at.
The context window controls how much the model can hold in its head at once. A bigger window helps chat reason over a whole file, but it costs memory, and for autocomplete you want the opposite: a small, tight context so each completion is quick. So it makes sense to leave the chat model on a generous window and limit the Coder, either through Continue's maxPromptTokens or by giving the autocomplete model its own oMLX profile with a smaller cap.
Temperature is the other one. For chat, something around 0.7 gives you varied, natural answers. For autocomplete you want the model boring and predictable, so drop it low, around 0.1 to 0.2. With a high temperature, a completion model makes up code that sounds plausible but is nonsense, while with a low temperature it finishes the line you were clearly going to write. oMLX lets you save these as a named per-model profile, so the same underlying Coder can serve a low-temperature build to autocomplete and stay out of the way of everything else.
The hard part: running two models at once
Running two models side by side, one for chat and one for autocomplete, asks a lot of your Mac, and it's where most home setups fall over. A small autocomplete model makes this much easier, which is why we switched.
Memory is the limit here, and our 7B Coder is only about 4.5GB on disk at 4-bit, so it barely registers. The chat model is the heavy one at roughly 19GB. That's around 24GB of weights in use before you've cached a single token. Apple Silicon's unified memory means the CPU and GPU share one pool, which works really well until you run out. Once your models plus their context windows go over the available memory, macOS starts swapping to disk, and throughput can collapse by 10x or more, which is far worse than a small slowdown.
So think carefully about what your machine can do. A small Coder plus a big chat model wants 32GB of unified memory as a sensible floor and is happier on 48GB or more, with the chat model setting the ceiling. Two large models at once is the combination that needs 64GB. If you've got 16GB, don't try to run both. Instead, point chat and autocomplete at the same 7B Coder, or run a tiny Coder for tab and nothing else.
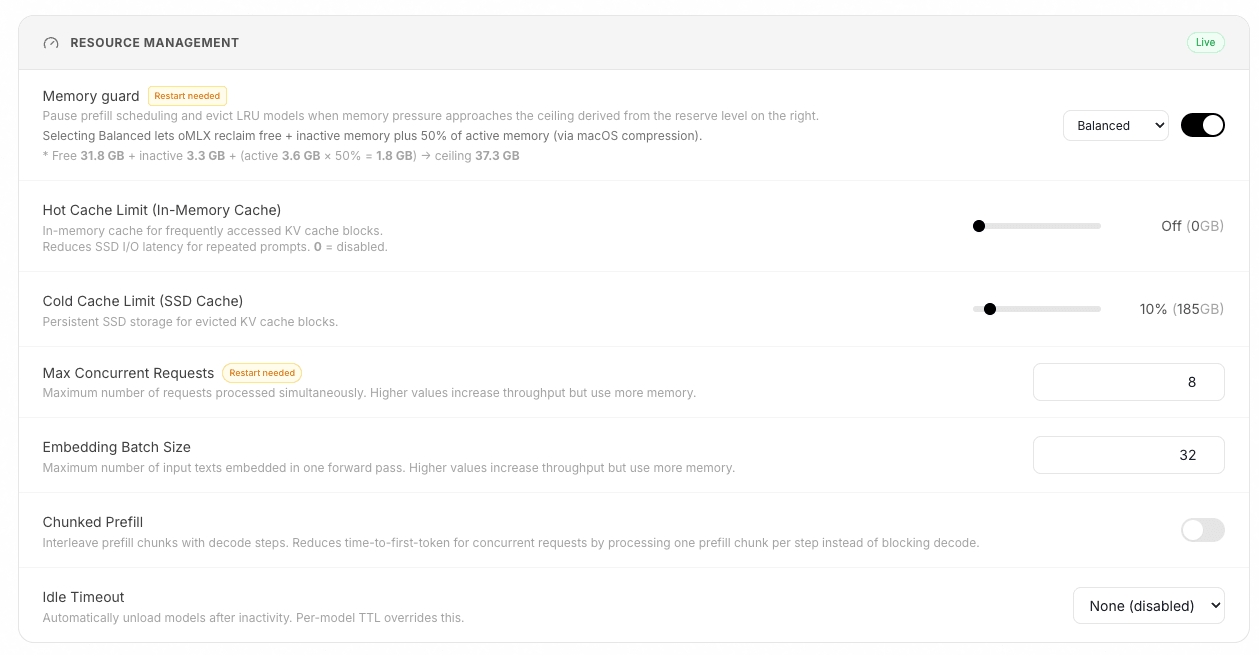
oMLX has some useful settings to help with this:
- Memory Guard. Pick safe, balanced, or aggressive. It enforces a ceiling on total memory use and evicts the least-recently-used model rather than letting the whole Mac seize up. Balanced is a sensible default, while aggressive reclaims more but leaves less headroom for everything else you've got open.
- Max Concurrent Requests. The default is 8. When chat and autocomplete fire at the same time, they queue here. Lower it if you're memory-bound and want to avoid two heavy generations colliding.
- Chunked Prefill. This interleaves prefill chunks with decode steps instead of blocking. So it stops a big chat request from freezing your autocomplete while it thinks. Turn it on if you're running both roles together.
- Tiered KV cache. oMLX keeps a hot cache in RAM and spills older blocks to an SSD cold cache, then restores them on a matching prefix instead of recomputing. This speeds up repeated prompts a lot, and it survives a restart.
- Idle Timeout / TTL. Auto-unload a model after a period of inactivity. Handy if you only chat occasionally and would rather hand that memory back to autocomplete most of the time.
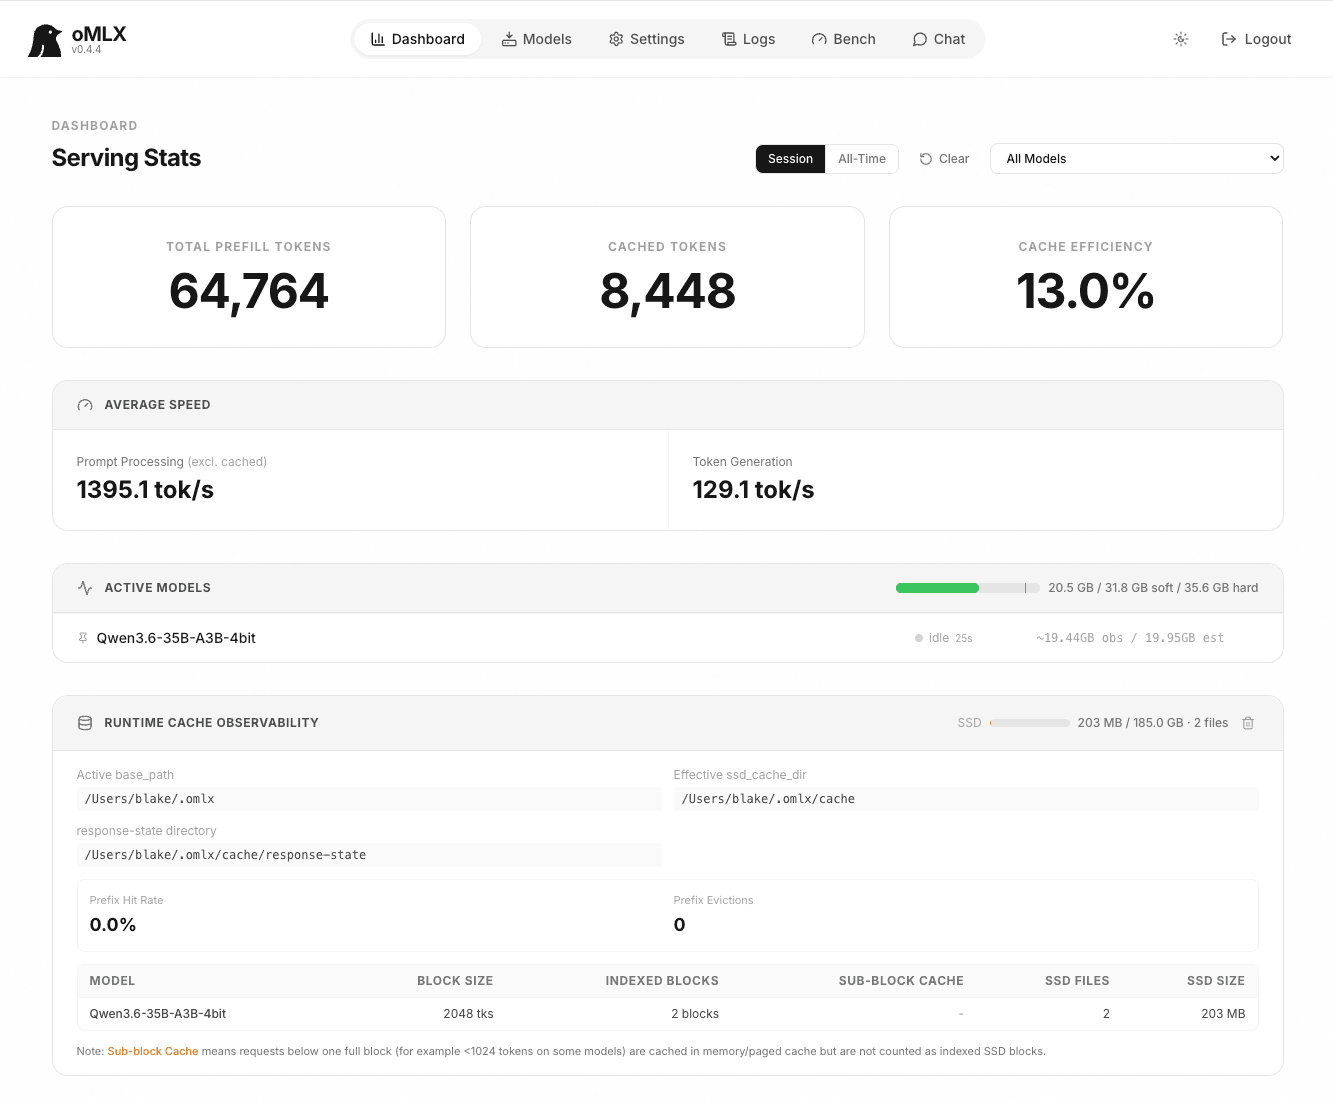
Under all of this, oMLX uses continuous batching, which processes concurrent requests through MLX's batch generator so chat and autocomplete share the GPU rather than blocking each other outright. You can watch it work in the dashboard: prefill speed, generation speed, and cache hit rate all update live, which is the quickest way to spot when you've used too much memory and everything has slowed right down.
Lighter setups: alternative models
You don't need our exact pair, and on a smaller machine you shouldn't try to run it. Everything below is on Hugging Face, and the MLX community quants are the ones to grab on Apple Silicon.
For autocomplete, keep to small Coder models. Qwen2.5-Coder-1.5B is the best choice for low latency and runs comfortably even on a 16GB Mac. Qwen2.5-Coder-3B is a noticeable step up in quality for not much more memory. Qwen2.5-Coder-7B is about as large as you'd want for tab completion. If you'd rather not run Qwen, StarCoder2-3B and the DeepSeek-Coder base models are also FIM-trained and slot straight into the same autocomplete role.
For chat and edits, it comes down to how much memory you can spare:
| Your Mac | Autocomplete model | Chat / edit model |
|---|---|---|
| 16GB | Qwen2.5-Coder-1.5B | Qwen2.5-Coder-7B-Instruct (shared) |
| 24–32GB | Qwen2.5-Coder-3B | Qwen2.5-Coder-14B-Instruct |
| 48GB | Qwen2.5-Coder-7B | Qwen2.5-Coder-32B-Instruct or Qwen3-Coder-30B-A3B |
| 64GB+ | Qwen2.5-Coder-7B | Qwen3-Coder-30B-A3B or larger |
On the smallest machines, it's best to point both roles at one 7B Coder. You lose the bigger model for chat, but everything stays in memory and stays fast. A FIM-capable Coder handles chat perfectly well, but a chat model doing FIM is the combination that breaks.
What you give up, and why it's still worth it
To be fair, local autocomplete on a Mac is slower than Cursor, and the reasoning on a quantised local model isn't as sharp as the best cloud models. You'll feel the difference on a tricky refactor or a subtle bug, and if you're used to GPT-class chat, the first day will feel like a small step down.
On the other hand, it's free, with no subscription and no per-seat fee, and it's private, so your proprietary code never leaves your laptop. That matters a great deal if you're under an NDA or working on anything sensitive. It also runs on a plane with the wifi off, and you can tune it, swap models or break it however you like.
We think it's a good place to start, and the gap is closing quickly. The Coder model you run today is a lot better than the one from eighteen months ago, and the next one is already in training. Local models keep getting better and the hardware to run them keeps getting cheaper, so if you set this up now, you'll be ready to use the open models as they catch up.
Key takeaways
You need a local server that speaks OpenAI (oMLX), an extension that gives you ghost text (Continue), and a Coder model that supports FIM for the autocomplete role. Mind your memory if you want two models at once, use oMLX's guard and batching settings to keep them running well, and scale the model sizes to the Mac you actually own.
You can have a private, free coding assistant running this afternoon. It won't be perfect, but if you start with the models from the table that fit your Mac and keep an eye on the oMLX dashboard, you'll soon find out what your machine can handle.
References
- oMLX, LLM inference optimised for your Mac
- Continue Autocomplete Setup and Configuration Guide
- Qwen2.5-Coder Technical Report (FIM training)
- Qwen3-Coder on GitHub (FIM support)
- Production-Grade Local LLM Inference on Apple Silicon (memory and swap behaviour)
- Local LLM Hardware Requirements: Mac vs PC 2026, SitePoint
Related insights
View all
Teaching Claude Code Your House Style with Agent Skills
Agent Skills let you put your team's conventions, workflows and checklists into a SKILL.md file that Claude Code loads when it needs it. Here's how skills differ from CLAUDE.md, why the description field matters so much, and the real skill we use to run this blog.

Website Accessibility: What the Equality Act Actually Requires
Your website counts as a service under the Equality Act 2010, and you have to make it accessible before anyone complains. UK enforcement is rare, but the lost customers are real, so we cover the £274bn Purple Pound, the four failures behind most broken sites, and a free ten-minute self-check.